How to Create a Critical-Loads List for Home Battery Backup: The Complete Sizing Guide
When severe weather, grid instability, or equipment failure cuts off your municipal power supply, a residential battery backup system can keep your home safe, illuminated, and operational. However, unless you invest tens of thousands of dollars in a massive, industrial-scale multi-battery array, your energy storage system will not run every single circuit and appliance in your house simultaneously.
Attempting to run high-draw appliances—such as central air conditioners, electric clothes dryers, water heaters, and electric ranges—on a standard single- or dual-battery setup will exhaust your stored power in a matter of hours or instantly trip your inverter’s overload protection.
To ensure your home remains functional throughout a short blackout or a multi-day emergency, you must isolate and prioritize your electricity usage. Creating a critical-loads list allows you to separate non-negotiable household needs from discretionary energy consumption.
This guide provides a step-by-step framework for auditing your household circuits, calculating running and surge wattages, selecting the right electrical panel architecture, and accurately sizing your battery and inverter capacity.
What is a Critical Load?
In residential energy management, a critical load refers to any breaker circuit, appliance, or electronic device deemed essential for safety, health, basic communication, or structural protection during a power outage.
During standard grid operation, your main electrical panel distributes power evenly across all connected circuits in your home. When the grid fails, a home battery system paired with an Automatic Transfer Switch (ATS) or critical-load subpanel instantly isolates your house from the grid (an action known as “islanding”). It then routes your stored battery power strictly to your pre-selected critical circuits.
┌────────────────────────────────────────────────────────────────────────┐
│                        MAIN ELECTRICAL PANEL                           │
│                     (Grid Power Supply Active)                         │
└───────────────────────────────────┬────────────────────────────────────┘
                                    │
                         [GRID POWER LOST / ISLANDING]
                                    │
                                    ▼
                 ┌──────────────────────────────────────┐
                 │       CRITICAL LOADS SUBPANEL        │
                 │      (Powered by Battery / Solar)    │
                 └──────────────────┬───────────────────┘
                                    │
        ┌───────────────────────────┼───────────────────────────┐
        ▼                           ▼                           ▼
 ┌───────────────┐           ┌───────────────┐           ┌───────────────┐
 │ Refrigeration │           │ Communication │           │ Medical &     │
 │ & Food        │           │ & Lighting    │           │ Environmental │
 └───────────────┘           └───────────────┘           └───────────────┘
By defining critical loads in advance, you ensure that limited kilowatt-hours ($\text{kWh}$) are conserved for essential needs—like keeping food fresh and powering medical devices—rather than wasted on non-essential comfort items.
Categorizing Household Electrical Loads: The 3-Tier System
The most effective way to design a critical-loads list is to categorize every device and circuit in your home into three distinct priority tiers.
               ┌─────────────────────────────────────────┐
               │    HOUSEHOLD ELECTRICAL LOAD TIERS     │
               └────────────────────┬────────────────────┘
                                    │
       ┌────────────────────────────┼────────────────────────────┐
       ▼                            ▼                            ▼
┌──────────────┐             ┌──────────────┐             ┌──────────────┐
│    TIER 1    │             │    TIER 2    │             │    TIER 3    │
│ Non-Nego-    │             │ Essential    │             │ Discretionary│
│ tiable       │             │ Comfort      │             │ & High-Draw  │
│ Essentials   │             │ & Work       │             │ (Shed Loads) │
└──────────────┘             └──────────────┘             └──────────────┘
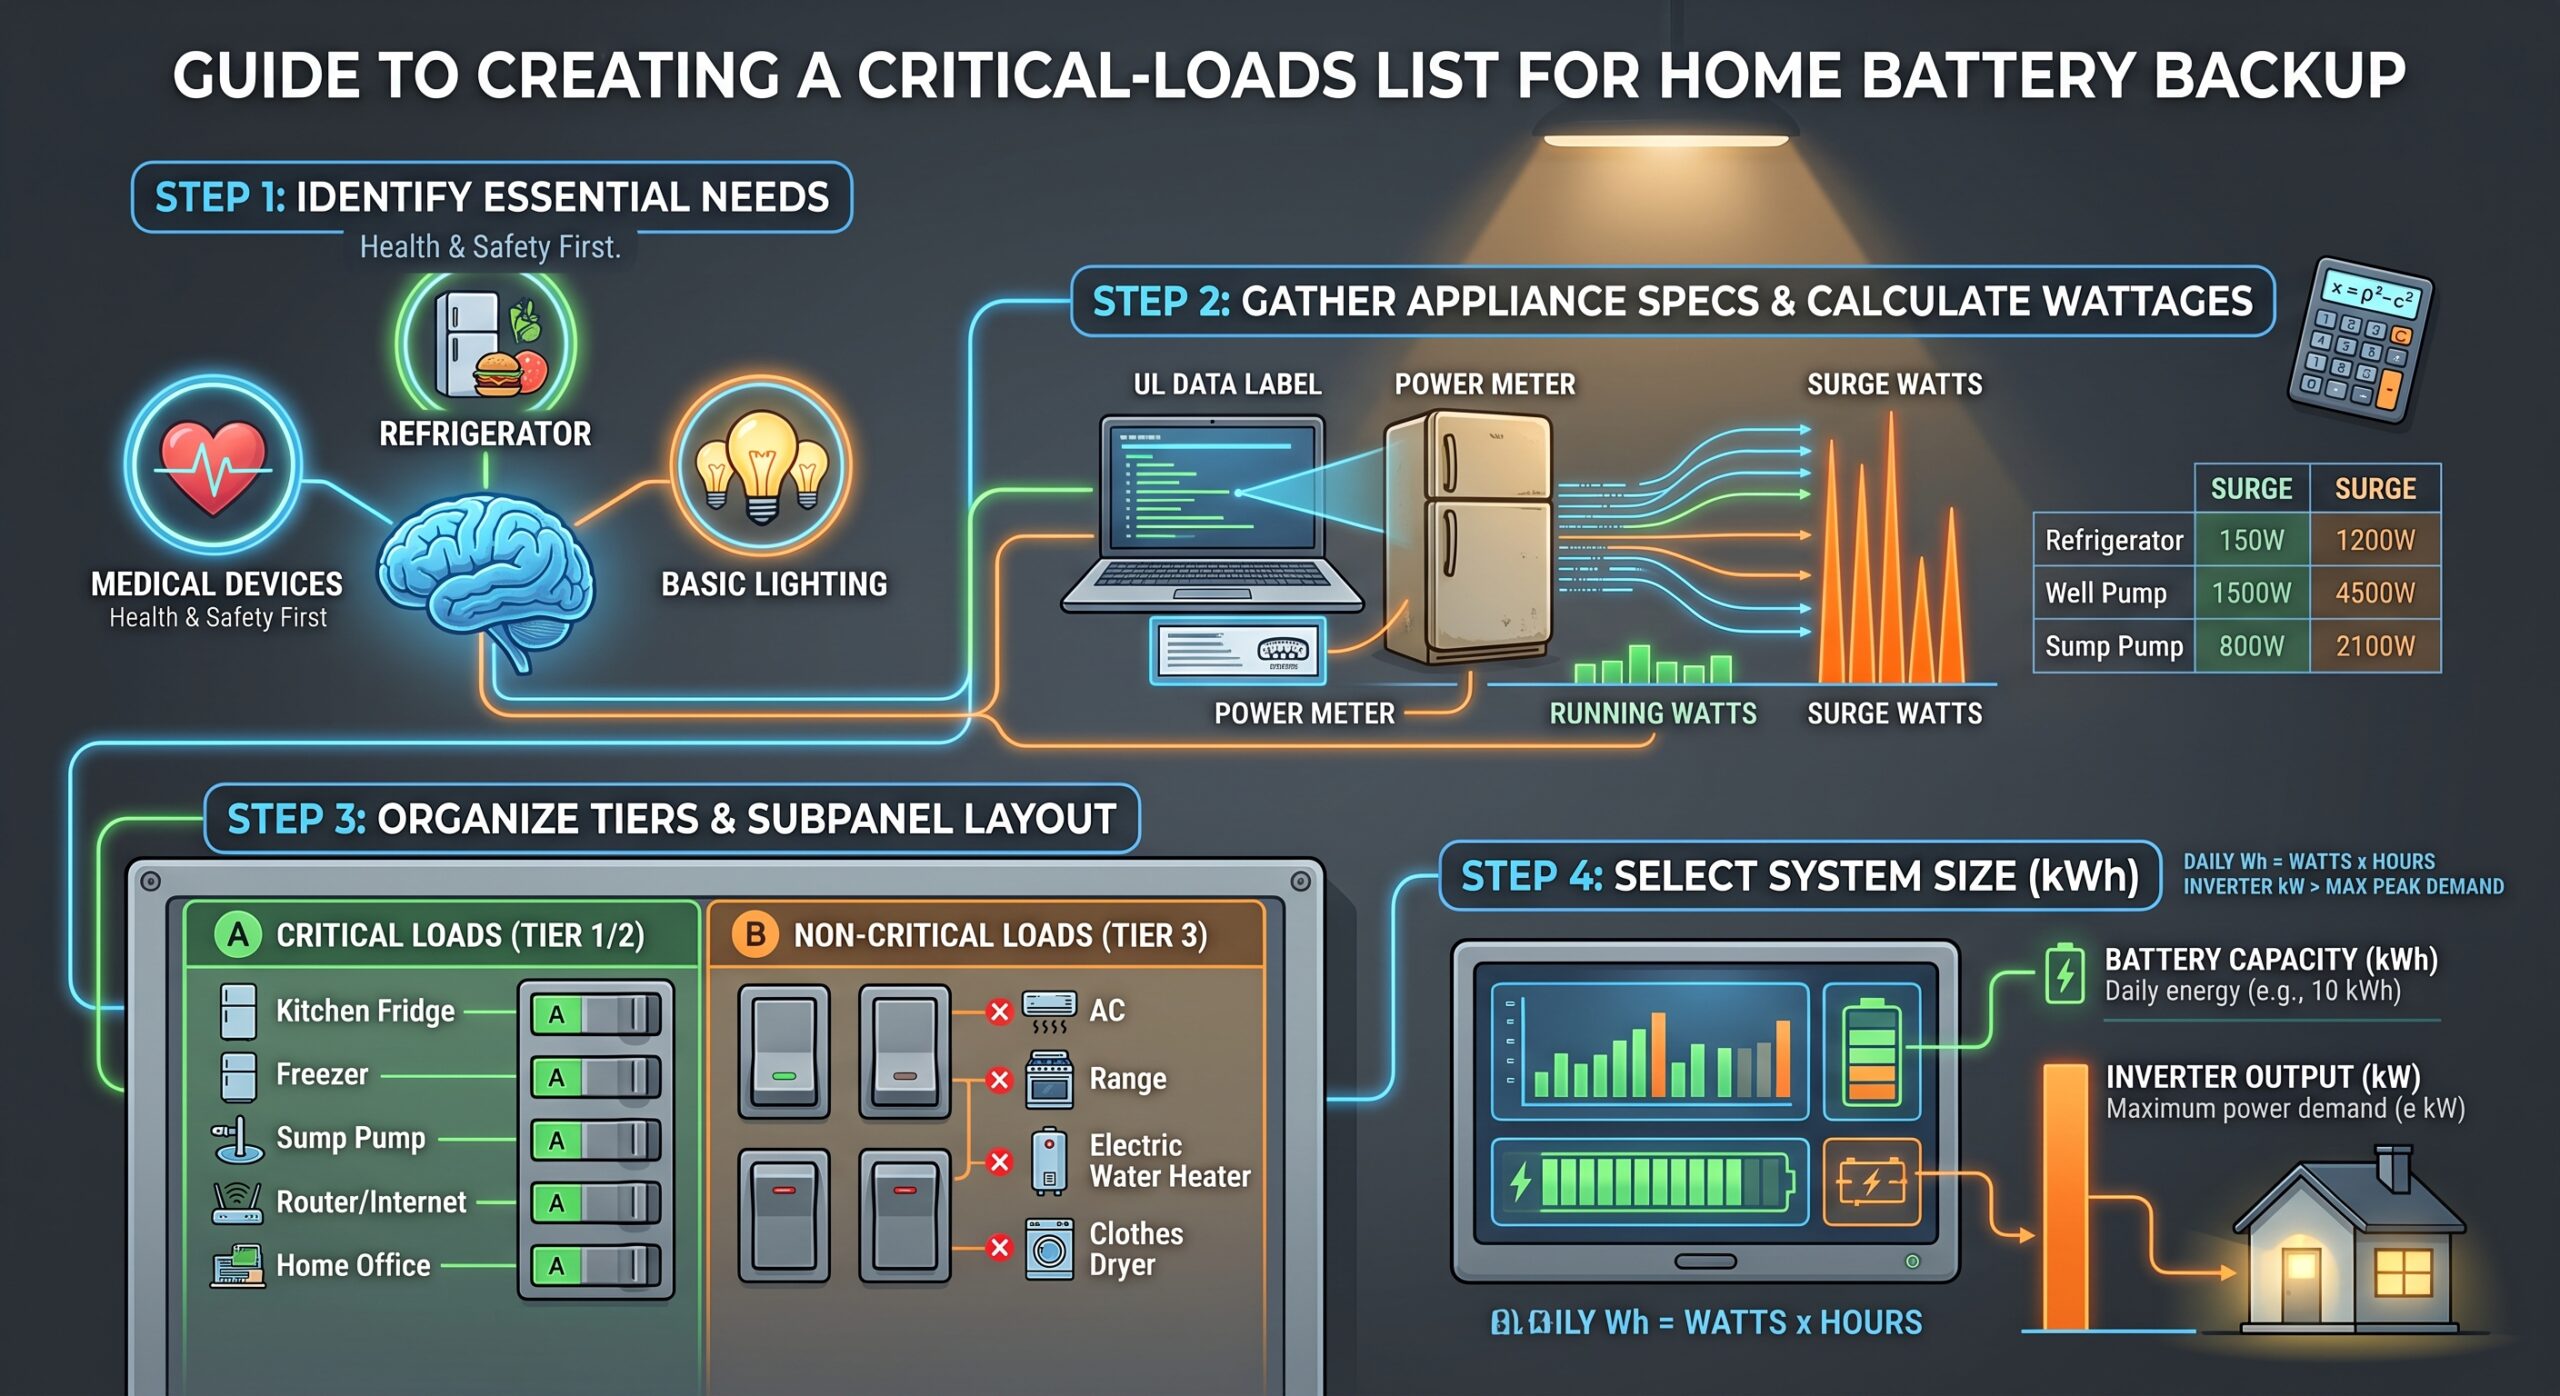
Tier 1: Non-Negotiable Essentials (Safety, Health, & Survival)
Tier 1 loads must remain powered under all circumstances. If these systems lose power, it can result in health risks, property damage, or a total loss of emergency communication.
-
Refrigeration & Food Storage: Standard kitchen refrigerators, standalone chest freezers, and mini-fridges storing temperature-sensitive medication.
-
Medical Equipment: Oxygen concentrators, CPAP machines, home dialysis units, or motorized care beds.
-
Property Protection Systems: Electric sump pumps (critical for preventing basement flooding in heavy rainstorms), well pumps (for homes relying on well water), and fire/security alarm hubs.
-
Core Communications: Home Wi-Fi routers, modems, fiber ONT boxes, and primary smartphone/device charging stations.
-
Egress & Security Lighting: External motion lights, entryway lighting, and primary interior hallway/stairwell lights.
Tier 2: Essential Comfort & Daily Functionality
Tier 2 loads do not directly threaten life or safety, but they significantly improve living conditions during multi-day outages and prevent structural deterioration.
-
Targeted HVAC & Heating: Furnace blowers (for gas or oil heating systems), low-draw mini-split heat pumps, or pellet stove feeders.
-
Targeted Living Area Lighting: Main kitchen overhead lights, bathroom lights, and living room ambient lighting.
-
Home Office & Remote Work: Laptops, external monitors, desktop workstations, and desk lighting.
-
Basic Kitchen Conveniences: Microwaves, small coffee makers, or low-wattage toaster ovens used intermittently.
Tier 3: Discretionary / High-Draw Loads (Shed by Default)
Tier 3 loads pull heavy electrical currents and should remain on your main electrical panel. They are automatically disconnected during an outage to protect your battery bank.
-
Central Air Conditioning (high-tonnage compressor units)
-
Electric Clothes Dryers and Washing Machines
-
Whole-Home Electric Resistance Heating
-
Electric Water Heaters (unless powered by an optimized solar diverter)
-
Electric Ovens, Stoves, and Ranges
-
Level 2 EV Chargers, Hot Tubs, Sauna Heaters, and Heated Swimming Pools
Understanding Electrical Metrics: Watts, Amps, Volts, and Energy
To accurately calculate your battery backup needs, you must understand four fundamental electrical measurements:
-
Volts ($V$): The measure of electrical pressure. Standard household outlets in North America operate at $120\text{ V}$, while high-power appliances (dryers, central AC, EV chargers) operate at $240\text{ V}$.
-
Amps ($A$): The volume of electrical current flowing through a circuit.
-
Watts ($W$ or $\text{kW}$): The real-time rate of power consumption. Calculated as:
$$\text{Watts} = \text{Volts} \times \text{Amps}$$(Note: $1\text{ kilowatt (kW)} = 1,000\text{ Watts}$)
-
Watt-Hours ($Wh$ or $\text{kWh}$): The total energy consumed over time. Calculated as:
$$\text{Watt-Hours} = \text{Watts} \times \text{Operating Hours}$$(Note: $1\text{ kilowatt-hour (kWh)} = 1,000\text{ Watt-Hours}$)
Continuous vs. Surge Wattage: The Hidden Trap
One of the most common mistakes homeowners make when creating a critical-loads list is confusing continuous wattage with surge (inrush) wattage.
  Power (Watts)
    ▲
    │   ┌──────┐  <-- Surge / Inrush Power (Compressor Startup)
    │   │      │      (Can be 2x to 4x continuous power for 1-3 seconds)
    │   │      │
    │───┴──────┴───────────────────────────  <-- Continuous Running Power
    │
    └───────────────────────────────────────► Time (Seconds)
-
Continuous Wattage: The steady amount of power an appliance draws while running normally (e.g., a light bulb pulling $10\text{ W}$ continuously).
-
Surge (Inrush) Wattage: The momentary spike of power required by electric motors and compressors to start up from a complete stop. This initial surge can be 2 to 4 times higher than the device’s continuous rating, lasting anywhere from a fraction of a second to a few seconds.
Common Appliances with High Surge Wattage
-
Refrigerators & Freezers: Continuous: $100\text{ W}$–$200\text{ W}$ | Surge: $1,000\text{ W}$–$1,500\text{ W}$
-
Sump Pumps ($1/2\text{ HP}$): Continuous: $800\text{ W}$–$1,050\text{ W}$ | Surge: $2,100\text{ W}$–$3,000\text{ W}$
-
Well Pumps ($1\text{ HP}$): Continuous: $1,500\text{ W}$–$2,000\text{ W}$ | Surge: $4,000\text{ W}$–$6,000\text{ W}$
-
Gas Furnace Blowers: Continuous: $400\text{ W}$–$600\text{ W}$ | Surge: $1,200\text{ W}$–$1,800\text{ W}$
If your battery’s inverter cannot handle the combined surge requirement of your devices when their compressors kick on simultaneously, the inverter will instantly trip its built-in circuit breaker to protect itself, shutting off your backup power completely.
Step-by-Step Guide: How to Calculate Your Critical Loads
Follow this step-by-step process to perform a comprehensive audit of your essential home electronics.
Step 1: Read the Physical UL Data Labels
Look for the silver or white Underwriters Laboratories (UL) specification sticker on the back, bottom, or inside door frame of your appliances.
┌──────────────────────────────────────────────────────────┐
│                   SPECIFICATION LABEL                    │
│                                                          │
│  MODEL: REF-2026X               VOLTS: 120V AC           │
│  FREQ: 60Hz                     AMPS: 6.5A               │
│  REFRIGERANT: R600a             MADE IN USA              │
└──────────────────────────────────────────────────────────┘
If the label states Amps instead of Watts, multiply the amperage by the voltage:
Step 2: Measure Real-World Usage with a Plug-in Power Meter
For appliances that cycle on and off (like refrigerators), manufacturer labels show maximum rated draw rather than average energy use. Plug devices into an inline Watt-meter (such as a Kill-A-Watt meter) for 24 hours to record exact daily kilowatt-hours ($\text{kWh}$).
Step 3: Estimate Duty Cycles and Daily Run-Times
Appliances rarely run continuously for 24 hours a day:
-
Refrigerators: Run roughly 8 to 10 hours total out of 24 (a ~33% to 40% duty cycle).
-
Sump Pumps: May run for 1 to 3 hours total during a severe rainstorm.
-
Lighting: Typically operates 5 to 7 hours during evening and morning hours.
-
Wi-Fi Routers: Run 24 hours continuously.
To find daily consumption, multiply running watts by estimated daily operating hours:
Critical Loads Inventory Worksheet
Use this comprehensive template to document your home’s essential electronics before selecting hardware:
| Circuit / Appliance | Priority Tier | Running Power (Watts) | Peak Surge Power (Watts) | Daily Operating Hours | Daily Energy Consumption (Watt-Hours) |
| Kitchen Refrigerator | Tier 1 | $150\text{ W}$ | $1,200\text{ W}$ | 8.0 hours | $1,200\text{ Wh}$ |
| Chest Freezer | Tier 1 | $100\text{ W}$ | $800\text{ W}$ | 6.0 hours | $600\text{ Wh}$ |
| Wi-Fi Router & Fiber Modem | Tier 1 | $25\text{ W}$ | $25\text{ W}$ | 24.0 hours | $600\text{ Wh}$ |
| CPAP Medical Machine | Tier 1 | $60\text{ W}$ | $60\text{ W}$ | 8.0 hours | $480\text{ Wh}$ |
| Sump Pump ($1/2\text{ HP}$) | Tier 1 | $900\text{ W}$ | $2,200\text{ W}$ | 1.5 hours | $1,350\text{ Wh}$ |
| LED Lighting (4 Zones) | Tier 2 | $60\text{ W}$ | $60\text{ W}$ | 6.0 hours | $360\text{ Wh}$ |
| Gas Furnace Fan / Blower | Tier 2 | $500\text{ W}$ | $1,200\text{ W}$ | 6.0 hours | $3,000\text{ Wh}$ |
| Laptops & Phone Chargers | Tier 2 | $80\text{ W}$ | $80\text{ W}$ | 5.0 hours | $400\text{ Wh}$ |
| Security Hub & Cameras | Tier 1 | $30\text{ W}$ | $30\text{ W}$ | 24.0 hours | $720\text{ Wh}$ |
| TOTALS | — | $1,905\text{ W}$ | $5,655\text{ W}$ (Peak) | — | $8,710\text{ Wh}$ ($8.71\text{ kWh}$) |
Sizing Your Battery and Inverter from Your Worksheet
Once your worksheet calculations are complete, translate those figures into hardware requirements. Your total figures determine two separate components of your battery backup system: Inverter Output and Battery Capacity.
                        ┌─────────────────────────────────┐
                        │  WORKSHEET TOTAL CALCULATIONS   │
                        └────────────────┬────────────────┘
                                         │
               ┌─────────────────────────┴─────────────────────────┐
               ▼                                                   ▼
┌─────────────────────────────┐                     ┌─────────────────────────────┐
│  TOTAL DAILY ENERGY (kWh)   │                     │   MAX PEAK DEMAND (Watts)   │
└──────────────┬──────────────┘                     └──────────────┬──────────────┘
               │                                                   │
               ▼                                                   ▼
┌─────────────────────────────┐                     ┌─────────────────────────────┐
│ Determines Battery Bank     │                     │ Determines Inverter Output  │
│ Storage Capacity (kWh)      │                     │ & Surge Ratings (kW)        │
└─────────────────────────────┘                     └─────────────────────────────┘
1. Inverter Sizing ($\text{kW}$ Output)
The inverter converts direct current ($\text{DC}$) energy stored in your battery into alternating current ($\text{AC}$) electricity used by your home circuits.
-
Continuous Inverter Output: Your inverter must be able to handle all continuous loads that might run at the same time. In our example table, the sum of all continuous loads is $1,905\text{ W}$ ($1.9\text{ kW}$).
-
Surge Output Capacity: The inverter must also absorb momentary surges. If your sump pump ($2,200\text{ W}$ surge) and refrigerator ($1,200\text{ W}$ surge) start at the same time while other devices are active, total peak demand could briefly reach $5,655\text{ W}$ ($5.65\text{ kW}$).
-
Hardware Selection: You will need an inverter rated for at least $5\text{ kW}$ continuous output with a surge rating of $7\text{ kW}$ or higher.
2. Battery Bank Sizing ($\text{kWh}$ Capacity)
Battery capacity determines how many hours or days your system can run before requiring a recharge from solar panels, a generator, or grid restoration.
To calculate total required battery storage:
-
Start with your daily consumption ($8.71\text{ kWh}$ from our sample table).
-
Account for system inefficiency (inverter conversion losses typically reduce total available energy by 10% to 15%).
-
Factor in a recommended safety margin (avoid draining your battery to absolute 0% regularly to preserve long-term chemical health).
To support the sample critical-loads list for a full 24 hours without solar or grid input, you would need a standard $10\text{ kWh}$ to $13.5\text{ kWh}$ residential lithium-iron-phosphate ($\text{LFP}$) battery module.
Hardwiring Your Critical Loads: Subpanels vs. Smart Panels
Once you have identified your critical circuits, an electrician must isolate them from your main electrical panel. There are two primary ways to route these connections:
                          ┌───────────────────────────┐
                          │   CIRCUIT ROUTING CHOICE  │
                          └─────────────┬─────────────┘
                                        │
             ┌──────────────────────────┴──────────────────────────┐
             ▼                                                     ▼
┌───────────────────────────┐                             ┌───────────────────┐
│ TRADITIONAL SUBPANEL      │                             │ SMART ELECTRICAL  │
│                           │                             │ PANEL             │
│ • Fixed breaker wiring    │                             │ • Digital relays  │
│ • Lower upfront cost      │                             │ • Smartphone app  │
│ • Physical re-wiring      │                             │ • Dynamic shedding│
│   required to change      │                             │ • Higher cost     │
└───────────────────────────┘                             └───────────────────┘
Option A: Traditional Critical Loads Subpanel
A standard critical-loads subpanel is a secondary breaker box installed alongside your primary service panel. During installation, a licensed electrician physically disconnects 6 to 12 target circuit wires from your main panel and re-routes them into the subpanel.
-
Pros: Highly reliable, safe, simple, and lower upfront hardware cost.
-
Cons: Rigid and permanent. If you decide during an outage that you want to turn off the guest room lights and turn on a different outlet, you cannot change this without physically rewiring the panel.
Option B: Smart Electrical Panels
Smart electrical panels replace standard legacy breaker boxes with digital switching relays. Examples include systems like SPAN, Schneider Pulse, or Lumin.
-
Pros: Complete software-defined flexibility. Through a smartphone app, you can turn individual breakers on or off in real time, monitor live power draw per circuit, and dynamically shift priorities during an extended storm.
-
Cons: Higher initial hardware and installation costs compared to standard subpanels.
Power Conservation Strategies for Extended Outages
If an outage extends past 48 hours and winter clouds reduce your solar panel output, strategic energy conservation can stretch your remaining battery life:
-
Cycle Refrigerators Manually: Refrigerators stay cold for hours if kept closed. You can turn off your refrigerator breaker for 2 hours, run it for 1 hour to pull down temperature, and repeat—reducing daily cooling energy consumption by over 50%.
-
Switch to High-Efficiency LED Lighting: Replace incandescent bulbs on backup circuits with LEDs to drop lighting power draw by up to 80%.
-
Unplug Phantom Loads: Household devices in standby mode (TVs, game consoles, microwave clocks) continuously draw power. Unplug them or switch off power strips completely.
-
Use Staggered Heating/Cooling Schedules: Avoid running high-draw appliances like microwave ovens while large motors (well pumps or furnace fans) are starting up.
Final Pre-Installation Checklist
Before scheduling a final installation with your solar and storage contractor, complete this verification checklist:
-
[ ] Physical Label Audit Complete: Recorded running amps/watts and estimated surge requirements for all Tier 1 devices.
-
[ ] Duty Cycles Calculated: Calculated true daily watt-hour usage rather than assuming 24-hour max draw.
-
[ ] 20% Capacity Buffer Added: Factored inverter conversion losses and reserve power buffers into total battery capacity calculations.
-
[ ] Voltage Compatibility Verified: Ensured all $240\text{ V}$ double-pole requirements (such as well pumps) match your chosen battery and inverter output specs.
-
[ ] Code Compliance & Permits: Confirmed that panel transfer equipment complies with local building codes, National Electrical Code ($\text{NEC}$) guidelines, and utility interconnection rules.