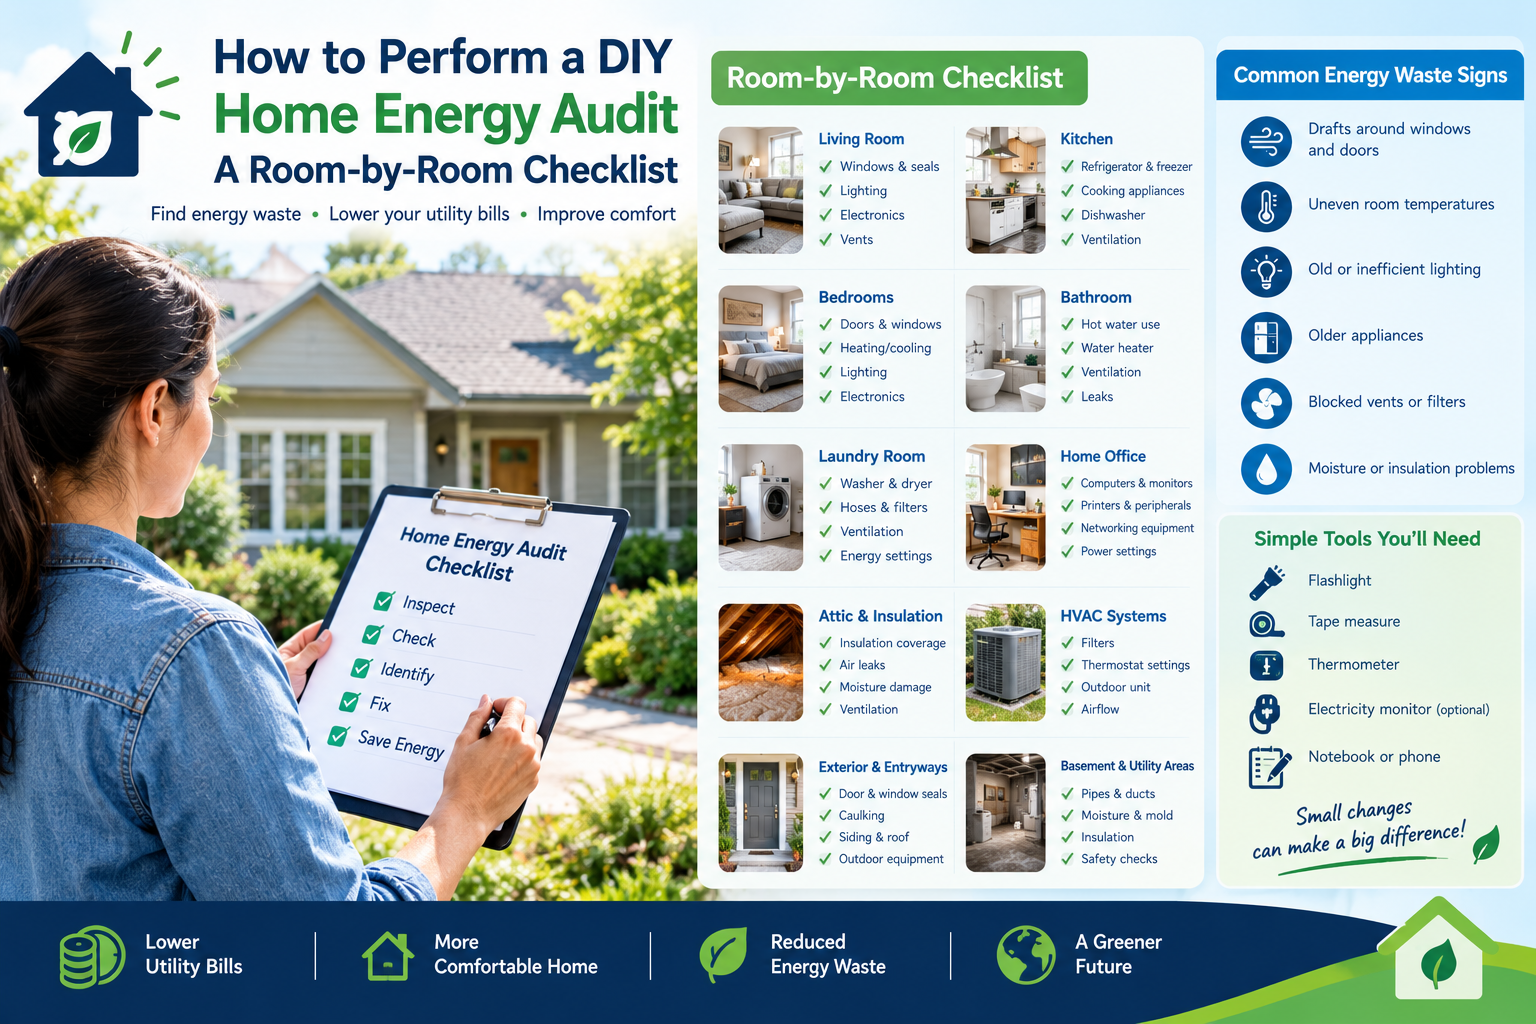
How to Perform a DIY Home Energy Audit: A Room-by-Room Checklist
High electricity bills, rooms that never seem comfortable, drafts near windows, and appliances that run constantly can all indicate that your home is wasting energy. The good news is that you do not need expensive equipment or a professional inspection to identify many common problems.
A DIY home energy audit is a systematic inspection of your home’s energy use, insulation, air leaks, lighting, appliances, and heating or cooling systems. By examining one room at a time, you can discover practical improvements that may reduce energy consumption, improve indoor comfort, and help control utility bills.
This guide explains how to perform a home energy audit step by step, what tools to use, what to inspect in each room, and how to prioritize improvements based on cost, safety, and likely impact.
Whether you own a house, rent an apartment, or simply want to understand where your electricity goes, this room-by-room checklist will help you get started.
What Is a DIY Home Energy Audit?
A DIY home energy audit is a basic assessment of how efficiently your home uses energy. It focuses on identifying visible problems and inefficient habits rather than performing specialized diagnostic tests.
During an audit, you inspect areas such as:
- Windows, doors, and other potential air leaks.
- Attic access points, visible insulation, and exterior walls.
- Lighting, electronics, and household appliances.
- Heating, ventilation, and air conditioning equipment.
- Water heating and hot-water use.
- Thermostat settings and daily energy habits.
- Utility bills and electricity consumption patterns.
The U.S. Department of Energy recommends assessing a home’s energy performance before deciding which efficiency improvements to make. A professional assessment may also use equipment such as blower doors and infrared cameras to detect problems that a visual inspection cannot identify. Source: U.S. Department of Energy.
Important: A DIY audit helps you find likely sources of energy waste, but it cannot reliably measure every air leak, determine all insulation defects, or establish the safety of electrical and fuel-burning systems.
Benefits of Performing a Home Energy Audit
A thorough inspection can help you make better decisions about energy use and home maintenance.
1. Identify unnecessary energy consumption
Lights left on, inefficient appliances, poor temperature settings, and electronics that remain in standby mode can all contribute to energy use. An audit helps you identify which habits and devices deserve attention.
2. Improve indoor comfort
Drafts, uneven temperatures, direct sunlight, and inadequate insulation can make some rooms uncomfortable. Finding the underlying problems can help you improve comfort without continually adjusting the thermostat.
3. Prioritize cost-effective improvements
Not every energy-saving project requires a major investment. Cleaning an accessible air-conditioner filter, sealing an appropriate gap, or replacing an inefficient bulb may be more sensible than immediately purchasing new windows or appliances.
4. Make better purchasing decisions
Before replacing an appliance or upgrading insulation, an audit can help you determine whether the existing equipment is inefficient, poorly maintained, or simply being used in a costly way.
5. Track improvements over time
Recording utility consumption before and after making changes gives you a practical way to evaluate results. Comparing similar billing periods is more meaningful than comparing bills from very different seasons.
Tools You Need for a DIY Home Energy Audit
You can complete a useful first inspection with ordinary household tools. Specialized equipment is optional.
| Tool | Purpose |
|---|---|
| Flashlight | Inspect dark corners, cabinets, and accessible utility areas |
| Notebook or phone | Record problems, observations, and possible fixes |
| Tape measure | Measure gaps and check visible insulation depth |
| Thermometer | Compare room temperatures |
| Electricity monitor | Measure the energy consumption of compatible plug-in devices |
| Utility bills | Establish a baseline for energy use |
| Weatherstripping or caulk | Seal suitable gaps after inspection |
| Camera | Photograph problems so you can compare them after repairs |
A plug-in electricity monitor is useful for compatible appliances, but it does not work with every device. Fixed appliances, high-power equipment, and hardwired circuits may require a qualified electrician or a suitable professionally installed monitoring device.
You do not need to purchase every tool before beginning. Start with your bills, a flashlight, and a simple checklist.
Step 1: Review Your Energy Bills Before Inspecting Rooms
Before walking around your home, establish a baseline.
Gather your most recent 12 months of electricity and fuel bills, if available. Record monthly consumption, total costs, and any unusual changes.
For electricity, look for the number of kilowatt-hours (kWh) consumed rather than relying only on the amount charged. Prices, taxes, and fees can change even when energy use stays the same.
Record these details:
- Monthly electricity consumption in kWh.
- Monthly electricity cost.
- Natural gas, heating oil, or other fuel consumption, where applicable.
- Changes in occupancy or working-from-home schedules.
- Major appliance purchases or changes in usage.
- Unusually high bills or sudden consumption increases.
If your utility provides hourly or daily consumption data, examine it for unusual patterns. A smart meter or energy monitor may help identify when usage increases, but readings alone may not tell you which device is responsible.
For U.S. households, ENERGY STAR’s Home Energy Yardstick offers a way to compare annual home energy use with similar homes. Its comparisons may not be suitable for every property type or location.
Once you have your baseline, begin the room-by-room inspection.
Step 2: Inspect the Living Room and Main Living Areas
Living rooms often contain televisions, entertainment systems, lighting, computers, fans, and other equipment. They may also have large windows that allow unwanted heat gain or heat loss.
Check windows and curtains
Inspect the edges of every window for damaged seals, cracked caulk, or visible gaps. On a cool or windy day, carefully check for drafts around the frame.
Look for:
- Gaps between window frames and surrounding walls.
- Loose or damaged weatherstripping.
- Curtains or blinds that allow strong sunlight to heat the room.
- Condensation or signs of moisture around windows.
- Furniture blocking heating or cooling vents.
Use curtains or blinds strategically. In hot weather, block intense direct sunlight where practical. In cooler weather, allow useful sunlight in during the day and close window coverings at night.
If you discover condensation, investigate moisture and ventilation as well as possible insulation problems. Condensation does not automatically mean a window needs replacing.
Inspect lighting
Check how many lights are used in the room and whether they are LED bulbs.
LED lighting generally uses less electricity than traditional incandescent lighting while providing comparable illumination. Choose bulbs with suitable brightness, color temperature, and compatibility with dimmers or enclosed fixtures.
A simple improvement is to turn off unnecessary lights and use task lighting where appropriate instead of illuminating an entire room.
Review televisions and entertainment devices
Check televisions, gaming consoles, speakers, streaming devices, and computers.
Ask yourself:
- Are devices left running when nobody is using them?
- Does a computer stay on overnight unnecessarily?
- Are power-saving settings enabled?
- Can compatible equipment be switched off safely when not in use?
- Are always-on features necessary?
Some devices use very little standby power, while others consume more. Measure compatible plug-in devices if you want to know their actual consumption rather than assuming every standby device is a major energy drain.
Living room checklist
-
Check windows for drafts and damaged seals.
-
Inspect visible caulking around window frames.
-
Replace suitable inefficient bulbs with LEDs.
-
Enable power-saving settings on televisions and computers.
-
Switch off unnecessary lighting and equipment.
-
Keep heating and cooling vents unobstructed.
-
Check for excessive sunlight or unwanted heat gain.
Step 3: Audit the Kitchen
Kitchens contain several energy-intensive appliances, including refrigerators, freezers, ovens, dishwashers, and cooking equipment.
Inspect the refrigerator and freezer
Refrigerators run throughout the day, so maintenance and operating conditions matter.
Check the following:
Door seals: Close the door on a piece of paper. If the paper slips out very easily, the seal may not be gripping properly at that location. Repeat the test around different parts of the door. This is a preliminary check, not a definitive diagnosis.
Temperature settings: Use an appliance thermometer to check actual temperatures when needed. For food safety, a refrigerator should generally remain at or below 40°F (4°C), and a freezer at 0°F (-18°C). Follow the appliance manufacturer’s guidance.
Airflow: Avoid overpacking the refrigerator so tightly that air cannot circulate. Keep external ventilation areas clear according to the manual.
Condenser coils: If the manufacturer recommends cleaning accessible coils, disconnect power before cleaning and follow the manual. Not all models have user-accessible coils.
Location: Keep the refrigerator away from excessive heat sources where possible, and allow the specified clearance around it.
Do not assume an older refrigerator must immediately be replaced. Compare its condition, measured or estimated consumption, expected remaining service life, and the cost of an efficient replacement.
Check cooking appliances
Ovens, electric cooktops, microwaves, and other cooking devices can use substantial energy depending on their power ratings and how frequently they operate.
Practical checks include:
- Use appropriately sized cookware on compatible burners.
- Match cookware size to the heating element where possible.
- Avoid opening the oven door repeatedly while cooking.
- Use a microwave or smaller appliance when it suits the meal and is more efficient for the task.
- Check oven-door seals and report faulty heating or temperature controls for repair.
Never dismantle an oven, cooktop, or gas appliance just to perform an energy audit.
Inspect the dishwasher
If you have a dishwasher, check whether it offers an energy-saving or eco cycle. Use full loads when practical, without overloading the machine or blocking spray arms.
Scrape food from dishes instead of automatically pre-rinsing them under running hot water, following the dishwasher manufacturer’s recommendations.
Inspect the door seal for damage and clean the filter as directed in the manual. A dirty filter or poor maintenance may affect performance even if it does not directly explain high electricity consumption.
Kitchen checklist
-
Check refrigerator and freezer door seals.
-
Verify appliance temperatures when appropriate.
-
Keep ventilation openings clear.
-
Clean accessible refrigerator coils if the manual permits.
-
Review refrigerator and freezer placement.
-
Use suitable cookware and cooking methods.
-
Use efficient dishwasher settings and full loads.
-
Clean appliance filters according to manufacturer instructions.
-
Record unusually old, noisy, or inefficient appliances for further evaluation.
Step 4: Inspect Bedrooms
Bedrooms commonly use lighting, fans, televisions, chargers, computers, and heating or cooling equipment. They can also reveal insulation and air-leak problems.
Check doors and windows
Inspect the perimeter of exterior-facing windows and doors. Look for cracked caulk, damaged seals, and visible gaps.
A simple paper test can help identify a poorly sealed window or door: close it on a sheet of paper and see whether the paper pulls out easily. Repeat at several locations because a seal may be uneven.
Repair gaps with materials appropriate for the location. Do not seal drainage openings in window frames or cover ventilation openings that are required for safety.
Review heating and cooling habits
If you use air conditioning or heating, consider whether the temperature is set lower or higher than necessary for comfort.
Programmable or smart thermostats can reduce unnecessary heating or cooling when used appropriately. Savings depend on your climate, equipment, schedule, and settings; a smart thermostat does not automatically guarantee lower bills.
Keep furniture and curtains away from vents and make sure portable fans are used safely.
Check electronics and chargers
Look at phone chargers, laptops, televisions, gaming devices, and bedside lamps.
Unplug devices when appropriate, or use a compatible switched power strip for equipment that does not need continuous power. Do not disconnect medical equipment, essential communications equipment, or devices that require continuous operation.
Bedroom checklist
-
Inspect windows and exterior doors for drafts.
-
Check seals and weatherstripping.
-
Review heating and cooling settings.
-
Keep vents clear of furniture and curtains.
-
Replace suitable inefficient bulbs with LEDs.
-
Enable sleep or energy-saving modes on electronics.
-
Identify equipment that stays on unnecessarily.
Step 5: Audit the Bathroom
Bathrooms use energy through water heating, lighting, ventilation, and sometimes heated floors or towel rails.
Check hot-water use
Hot water requires energy to heat and may also lose heat while stored or traveling through pipes.
Inspect for dripping hot-water taps and leaking pipes. Fixing a leak saves water and may reduce energy use if hot water is involved.
Consider these improvements:
- Install an efficient showerhead if it is compatible with your plumbing and water pressure.
- Take shorter showers where practical.
- Turn off the tap when hot running water is not needed.
- Wash hands with an appropriate amount of water.
- Insulate accessible hot-water pipes only where suitable and safe.
Inspect the water heater
If the water heater is accessible, look for obvious leaks, corrosion, damaged insulation, or unusual noises. Do not open electrical compartments or dismantle a gas water heater.
Where applicable, the U.S. Department of Energy commonly recommends a water-heater setting around 120°F (49°C) for many households, but the correct setting depends on the equipment, manufacturer instructions, and health requirements. Some households need higher storage temperatures to control harmful bacteria, combined with appropriate anti-scald protection.
Never change a water heater’s temperature or safety controls without understanding the manufacturer’s instructions and applicable local requirements.
Check bathroom ventilation
Exhaust fans remove moisture and help manage humidity. Do not disable necessary ventilation simply to save electricity.
Clean the fan grille and follow the manufacturer’s maintenance instructions. If a fan is noisy, ineffective, or vents into an attic instead of outdoors, arrange appropriate repair.
Bathroom checklist
-
Fix dripping hot-water taps.
-
Check visible hot-water pipes for leaks.
-
Review shower duration and water use.
-
Check water-heater condition without dismantling it.
-
Follow manufacturer guidance for temperature settings.
-
Clean bathroom exhaust fan grilles.
-
Confirm that required ventilation is working properly.
Step 6: Inspect the Laundry Room
Laundry appliances can consume significant electricity, gas, and hot water, depending on the equipment and usage patterns.
Check the washing machine
Use cold-water cycles for suitable loads, choose efficient cycles, and run full loads without exceeding the manufacturer’s capacity.
Inspect hoses for leaks, cracks, and bulges. Replace damaged hoses promptly and follow the manual’s guidance for maintenance.
If your washer offers an eco cycle, compare its duration and performance with other cycles. A longer cycle does not necessarily mean it uses more energy; some efficient cycles run longer while using less heat or water.
Inspect the dryer
Dryers can be major energy users, particularly when they have poor airflow or run longer than necessary.
Check the lint filter and clean it before each load. Inspect the outside dryer vent for lint buildup or restricted airflow when it is safe to do so.
Look for:
- Lint accumulating around the dryer.
- Clothes taking unusually long to dry.
- A damaged or crushed exhaust duct.
- A vent flap that does not open correctly.
- Excessive heat around the appliance.
A blocked dryer vent is both an efficiency problem and a potential fire hazard. Stop using the dryer if you suspect a serious blockage, and have the vent cleaned or repaired as needed.
Never operate a dryer with a disconnected exhaust duct where outdoor venting is required. Follow the manufacturer’s instructions, particularly for gas dryers.
Laundry checklist
-
Use cold-water washing when appropriate.
-
Choose efficient cycles and suitable load sizes.
-
Inspect washer hoses for damage or leaks.
-
Clean the dryer’s lint filter before each load.
-
Check for restricted dryer exhaust airflow.
-
Avoid unnecessary repeat drying cycles.
-
Maintain appliances according to their manuals.
Step 7: Check the Home Office
Home offices may contain computers, monitors, printers, routers, lighting, and other equipment that remains on for long periods.
Inspect computers and monitors
Enable built-in energy-saving features, including automatic screen sleep and computer sleep settings. Shut down or power off equipment when it is not needed, unless a task requires it to remain running.
If you work remotely, consider whether you need multiple monitors, bright task lighting, or other equipment operating throughout the day.
Check printers and other peripherals
Printers and scanners can often remain in low-power modes. Review their settings and switch off equipment that does not need to remain on.
For a better understanding of energy use, measure compatible plug-in devices with an electricity monitor. Record both operating and standby consumption if the monitor supports those measurements.
Inspect the router and networking equipment
Routers and internet equipment often operate continuously. Their consumption may be relatively modest, but you can check whether unused network equipment is still plugged in.
Avoid routinely switching off essential routers if doing so interrupts security devices, work, phone service, or other equipment that relies on the connection.
Home office checklist
-
Enable computer and monitor power-saving settings.
-
Turn off equipment that is not needed.
-
Measure compatible plug-in devices if useful.
-
Review printer and peripheral standby settings.
-
Keep cooling vents on computers unobstructed.
-
Avoid disabling essential networking or security equipment.
Step 8: Inspect Hallways, Entryways, and Exterior Doors
Entryways are common locations for drafts because exterior doors open frequently and their seals can deteriorate.
Check the full perimeter of each exterior door, including the threshold and the area where the frame meets the wall.
Look for:
- Worn weatherstripping.
- Visible gaps beneath doors.
- Loose door sweeps.
- Damaged caulk around frames.
- Light coming through gaps where a seal should be.
- Drafts near mail slots or other wall openings.
Replace damaged weatherstripping or door sweeps with suitable products. For gaps between the door frame and wall, use a sealant appropriate for the material and location.
Do not block required combustion-air openings, ventilation grilles, or escape routes. Weatherproofing should not compromise safe ventilation or the ability to exit the building.
Entryway checklist
-
Inspect exterior door seals.
-
Check door thresholds and sweeps.
-
Look for gaps around frames.
-
Inspect mail slots and other openings.
-
Seal suitable gaps without blocking required ventilation.
Step 9: Inspect the Attic and Insulation
Heat can move through ceilings, walls, floors, and roof structures. Inadequate insulation and air leakage can increase heating and cooling demands.
An attic inspection may reveal uneven insulation, exposed gaps, moisture damage, or unsealed openings.
Check visible insulation
From a safe, accessible location, look for areas where insulation is missing, compressed, damaged, or unevenly distributed.
If you can safely see the attic floor, note whether insulation appears level with or below the joists. This may indicate that additional insulation is worth investigating, but appropriate insulation depth depends on the material, climate, building design, and local standards.
Do not assume that simply adding more insulation will solve every problem. Air leakage, moisture, ventilation, and existing wiring must also be considered.
Inspect for air leaks
Pay attention to accessible areas around:
- Attic hatches.
- Pipes and ducts.
- Cable penetrations.
- Gaps between walls and ceilings.
- Recessed lights and other ceiling fixtures.
- Chimneys and flues.
Some gaps require specialist materials or professional work. Keep insulation and sealants away from hot flues, heat-producing equipment, and electrical components unless the relevant product and building instructions explicitly permit their use.
Important attic safety precautions
Do not walk directly on exposed ceiling drywall. If an attic is not designed for walking, stay out or have a qualified professional inspect it.
Wear suitable protective equipment when inspecting accessible insulation. Stop if you see damaged wiring, wet insulation, mold, animal contamination, or materials that may contain asbestos.
In particular, do not disturb suspected asbestos-containing vermiculite insulation. Contact an appropriate professional for assessment.
Attic checklist
-
Inspect visible insulation for gaps and uneven coverage.
-
Look for moisture damage and roof leaks.
-
Check the attic hatch seal.
-
Note visible gaps around pipes and ducts.
-
Look for unsafe wiring or damaged building materials.
-
Do not disturb suspected asbestos-containing insulation.
-
Arrange professional assessment when access or safety is uncertain.
Step 10: Check Heating, Cooling, and Ventilation Equipment
Heating and cooling equipment can be among the largest contributors to household energy consumption. Its performance depends on equipment condition, settings, airflow, maintenance, and the building itself.
Inspect air filters
Check the filter in your heating or cooling system according to the manufacturer’s schedule. A dirty filter can restrict airflow and reduce performance.
Replace or clean it as directed. Use the correct size and type; a filter that is too restrictive or incorrectly fitted may cause problems.
Inspect accessible vents and registers
Make sure furniture, rugs, and curtains do not block airflow. Check for dust accumulation and obvious damage.
If some rooms are consistently too hot or cold, record the locations and conditions. The cause may involve insulation, air leakage, duct balancing, equipment capacity, or other factors.
Review thermostat settings
Use a comfortable setting appropriate for your climate and equipment. If you have a programmable thermostat, schedule temperature changes for periods when the home is unoccupied or occupants are asleep, where practical.
Avoid extreme settings that make the system work unnecessarily hard or compromise comfort and health.
Check outdoor equipment
For an outdoor air-conditioner or heat-pump unit, keep leaves, debris, and other obstructions away from the unit according to the manufacturer’s clearance requirements.
Do not open electrical compartments, handle refrigerant lines, or attempt refrigerant repairs yourself. Those tasks may require a licensed professional.
Heating and cooling checklist
-
Inspect and maintain filters.
-
Keep supply and return vents unobstructed.
-
Review thermostat schedules.
-
Check accessible outdoor equipment for debris.
-
Record rooms with persistent temperature differences.
-
Schedule professional maintenance when needed.
-
Leave electrical and refrigerant repairs to qualified technicians.
Step 11: Inspect the Basement, Crawl Space, and Utility Areas
If your home has a basement, crawl space, or accessible utility area, inspect it for visible gaps, moisture, damaged insulation, and poorly sealed openings.
Look around accessible pipes, foundation edges, ducts, and service penetrations. Air leaks between conditioned rooms and unconditioned spaces can affect comfort and energy use.
Also look for damp insulation, water intrusion, mold, pest damage, or corrosion. These issues should be addressed before sealing or insulating the affected area.
Never enter an unsafe crawl space or confined area. Avoid touching exposed wiring, electrical panels, or fuel-burning equipment during the inspection.
Basement and utility-area checklist
-
Look for visible gaps around pipes and service entries.
-
Check accessible ductwork for obvious damage.
-
Inspect visible insulation for moisture or deterioration.
-
Record signs of water intrusion or mold.
-
Check that vents and equipment clearances are not obstructed.
-
Refer electrical, gas, and structural concerns to qualified professionals.
Step 12: Check Outdoor Areas and the Building Exterior
The outside of the building can reveal problems that affect indoor energy use.
Walk around the property and inspect visible window and door frames, exterior caulking, siding joints, and accessible utility penetrations.
Look for:
- Cracked or missing sealant.
- Damaged weatherstripping.
- Gaps where different exterior materials meet.
- Damaged exterior vent covers.
- Vegetation or debris obstructing outdoor HVAC equipment.
- Roof or wall leaks that may affect insulation.
Shade from trees, awnings, or exterior blinds may help reduce unwanted solar heat in hot climates. However, the best strategy depends on the building’s orientation, climate, and seasonal needs.
Do not climb onto a roof or ladder unless you have the training and equipment to do so safely.
Exterior checklist
-
Inspect visible exterior gaps and damaged caulk.
-
Check accessible door and window frames.
-
Look for signs of water entry.
-
Keep outdoor HVAC equipment clear.
-
Consider practical shade for windows exposed to intense sun.
-
Arrange professional repairs for roof or structural defects.
Step 13: Identify Phantom Power and Unnecessary Electricity Use
Some electronic devices continue using electricity when they appear to be off. This is often called standby power or phantom load.
Examples may include televisions, game consoles, printers, speakers, chargers, and smart-home equipment.
The amount of energy involved varies by device. Rather than unplugging everything automatically, identify which devices use meaningful power and which need to remain connected.
How to check standby power
- Select a compatible plug-in electricity monitor.
- Connect the monitor according to its instructions.
- Measure the device while it operates normally.
- If supported, measure its standby consumption.
- Record the readings and how many hours the device typically operates.
- Decide whether changing the settings or switching it off is worthwhile.
To estimate daily energy use:
[
\text{Daily kWh}=\frac{\text{Power in watts}\times\text{Hours used}}{1000}
]
For example, a 100-watt device operating for 5 hours uses:
[
\frac{100\times5}{1000}=0.5\text{ kWh}
]
To estimate the cost, multiply the kWh consumed by your electricity tariff. If your utility uses time-of-use rates, different periods may have different prices.
Step 14: Use Simple Tests to Find Air Leaks
You do not need professional equipment to find some obvious drafts, but simple tests have limitations.
The visual inspection
Look for cracked caulk, damaged seals, and visible gaps around doors, windows, and accessible service penetrations.
The paper test
Close a window or exterior door on a sheet of paper. If the paper pulls out easily, the seal may be weak at that point. Repeat at different locations.
The flashlight test
At night, shine a flashlight along a suspected gap while another person checks the opposite side, where accessible. Visible light can indicate a gap, although the test will not detect every leak.
The hand test
On a suitable day, move your hand slowly around window and door edges to feel for moving air. This can help locate obvious drafts but is not a precise measurement.
What about smoke or incense tests?
Smoke tests can help reveal air movement, but they introduce a flame or airborne particles. Do not use an open flame or smoke around gas appliances, combustible materials, or areas where doing so could create a fire or indoor-air hazard. Never perform a depressurization test without properly addressing combustion appliances and ventilation.
If you suspect substantial air leakage, a professional blower-door test is a safer and more reliable way to quantify airtightness and identify hidden leaks.
Step 15: Create a Home Energy Audit Action Plan
Once you have inspected every area, create a list of the problems you found. Then rank them by likely impact, cost, difficulty, and safety.
| Priority | Example issue | Suggested next step |
|---|---|---|
| High | Suspected blocked dryer vent | Stop use if unsafe; arrange cleaning or repair |
| High | Exposed wiring or suspected gas leak | Stop the inspection and contact a qualified professional or emergency service as appropriate |
| High | Water intrusion or damp insulation | Identify and repair the moisture source before insulating |
| Medium | Damaged door weatherstripping | Replace with a suitable seal |
| Medium | Dirty accessible HVAC filter | Clean or replace according to the manual |
| Medium | Inefficient lighting | Replace suitable bulbs with LEDs |
| Medium | Poor thermostat schedule | Adjust settings to match household routines |
| Lower | Unnecessary standby power | Measure and switch off suitable devices |
| Longer-term | Inadequate attic insulation | Compare climate-appropriate recommendations and obtain quotes if needed |
Priorities can vary. A large, persistent air leak may be more important than replacing a few light bulbs, while a faulty appliance or safety issue may need immediate attention.
Estimate potential savings realistically
Avoid assuming that every recommended improvement will deliver a particular percentage of savings. Actual results depend on your home, climate, energy prices, equipment, and the condition of existing insulation and seals.
Instead, estimate the potential value of each improvement using your own measurements, bills, and quotes.
For example, if a change reduces electricity use by 40 kWh per month and your effective rate is $0.20 per kWh, the estimated monthly saving is:
[
40\times $0.20=$8
]
This is an illustration, not a promise of savings. Your actual rate and reduction may differ.
Printable Room-by-Room DIY Home Energy Audit Checklist
Use this consolidated checklist during your inspection. Mark each item as OK, Needs attention, or Not applicable.
Whole home
-
Review recent energy bills.
-
Record electricity and fuel consumption.
-
Check thermostat settings.
-
Inspect accessible doors and windows for drafts.
-
Identify inefficient lighting.
-
Record unusual temperature differences.
-
Note safety or moisture concerns.
Living room
-
Inspect windows and seals.
-
Check curtains and solar heat gain.
-
Replace suitable inefficient bulbs.
-
Review TV and entertainment-device usage.
-
Keep vents unobstructed.
Kitchen
-
Check refrigerator and freezer seals.
-
Verify temperatures if needed.
-
Inspect accessible appliance ventilation.
-
Clean permitted filters and coils.
-
Review cooking and dishwasher habits.
Bedrooms
-
Check window and door seals.
-
Review heating and cooling settings.
-
Enable power-saving modes.
-
Turn off unnecessary lighting and equipment.
Bathroom
-
Fix hot-water leaks.
-
Check shower and hot-water habits.
-
Inspect accessible water-heater areas.
-
Clean exhaust fan grilles.
-
Maintain required ventilation.
Laundry room
-
Inspect washer hoses.
-
Use efficient washing cycles.
-
Clean the dryer lint filter.
-
Check dryer exhaust airflow.
-
Record unusually long drying times.
Home office
-
Enable computer sleep settings.
-
Check monitor and printer power settings.
-
Measure compatible plug-in devices.
-
Review unnecessary standby power.
-
Keep equipment ventilation clear.
Attic and insulation
-
Check visible insulation coverage.
-
Look for roof leaks or damp materials.
-
Inspect the attic hatch seal.
-
Note accessible gaps around pipes and ducts.
-
Avoid disturbing suspected hazardous materials.
Heating and cooling
-
Inspect filters.
-
Keep vents unobstructed.
-
Clear debris from outdoor units.
-
Review thermostat schedules.
-
Record persistent comfort problems.
Exterior and utility areas
-
Inspect visible exterior sealant.
-
Check for signs of water entry.
-
Note damaged ductwork or insulation.
-
Record safety concerns for professional review.
-
Rank improvements by priority and cost.
Common DIY Home Energy Audit Mistakes to Avoid
1. Focusing only on electricity bills
Your bill can rise because of changing tariffs, seasonal temperatures, occupancy, or fuel costs. Review energy consumption alongside the amount charged.
2. Buying upgrades before identifying the problem
New windows, appliances, or thermostats may not be the most cost-effective first step. Inspect and measure before making major purchases.
3. Sealing every opening
Some openings are necessary for drainage, ventilation, or safe operation of fuel-burning appliances. Seal only suitable gaps using the correct materials.
4. Ignoring moisture problems
Insulating or sealing a damp area without fixing the source of water can trap moisture and worsen building damage.
5. Assuming every device consumes a lot of standby power
Measure where practical and focus on the devices with the greatest avoidable consumption.
6. Treating a visual audit as a professional diagnosis
A walk-through cannot determine every hidden defect or prove that a heating, cooling, electrical, or combustion system is safe.
7. Failing to measure results
Record consumption before making changes and compare it with later periods under similar conditions. Otherwise, it is difficult to tell whether an improvement made a difference.
When Should You Hire a Professional Energy Auditor?
A DIY inspection is a useful starting point, but professional help may be appropriate when:
- Your energy bills remain unusually high despite simple improvements.
- Some rooms are persistently too hot or cold.
- You suspect major air leaks or missing insulation.
- Your heating or cooling system runs excessively or performs poorly.
- You notice moisture damage, mold, or damp insulation.
- You want a blower-door test or infrared assessment.
- You are considering expensive insulation, window, or HVAC upgrades.
- You find damaged wiring or suspect a problem with a fuel-burning appliance.
A qualified professional can assess the building as a whole, identify problems that are difficult to see, and recommend improvements based on safety, comfort, and cost-effectiveness.
Frequently Asked Questions
How long does a DIY home energy audit take?
A basic walk-through may take one to three hours, depending on the size of the home and the number of rooms. Reviewing a full year of bills and investigating specific problems may take longer.
Can I perform a home energy audit without special tools?
Yes. A flashlight, utility bills, notebook, and careful visual inspection are enough to identify many common problems. Electricity monitors and other tools can provide additional information but are not essential for a first audit.
What should I check first during a home energy audit?
Start with utility bills, obvious drafts, thermostat settings, lighting, appliance maintenance, and heating or cooling filters. Address immediate safety issues before undertaking efficiency upgrades.
Does a DIY home energy audit save money?
The audit itself can help you identify opportunities, but savings depend on which problems you find and whether the resulting changes reduce energy consumption. Some improvements cost very little, while others require professional work or a larger investment.
Should I inspect my attic myself?
Only if it is safely accessible and you can inspect it without walking on unsupported ceiling surfaces or disturbing hazardous materials. If you find damp insulation, damaged wiring, suspected asbestos-containing material, or other hazards, stop and consult a professional.
How often should I perform a home energy audit?
Perform a basic review annually and whenever you notice an unexplained increase in energy use, a change in comfort, or a major appliance or HVAC replacement. Check filters and other routine maintenance items at the intervals recommended by the manufacturer.
Is a DIY audit as accurate as a professional energy audit?
No. A DIY audit can reveal obvious problems, but professional assessments may include blower-door testing, infrared imaging, equipment checks, and other diagnostics. Use a professional when you need a more complete evaluation or when safety is uncertain.
Final Thoughts
Performing a DIY home energy audit is a practical way to understand how your home uses energy and where improvements may be worthwhile. By inspecting the living room, kitchen, bedrooms, bathrooms, laundry room, office, attic, HVAC equipment, and exterior, you can build a clear list of potential problems instead of guessing where your money is going.
Start with the simplest steps: review your bills, look for drafts, maintain appliances, adjust unnecessary energy use, and record what you find. Then prioritize repairs and upgrades based on safety, likely impact, and cost.
Most importantly, measure the results. Comparing energy consumption before and after improvements helps you determine which changes work best in your home. If you uncover hidden defects or safety concerns, bring in a qualified professional rather than attempting risky repairs.
A careful audit will not solve every energy problem overnight, but it gives you a sensible plan for improving comfort, reducing waste, and making more informed home-efficiency decisions.